Pages

Showing posts with label Recipes. Show all posts

Thursday, 23 August 2018

Old-fashioned Sweet Brioche

Basic Brioche
Basic Brioche


This is one of those recipes that I have been longing to share with you. During winter I often baked these sweet brioche buns from my childhood.

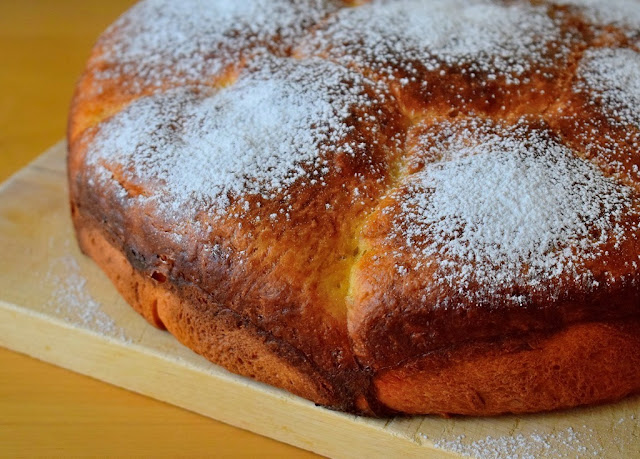
Although my brioche buns do not have an attractive appearance, I can tell you without pretension that they were super delicious. The crumb was perfect, very soft and light. 

The ingredients are very simple - flour, sugar, eggs, milk and fresh yeast.  However, this old-fashioned method used by grandmothers is a slow rise method. It takes approximately 4 hours for the first rise and another 2 hours for the second rise. It is worth the wait as you get the traditional taste of brioche.

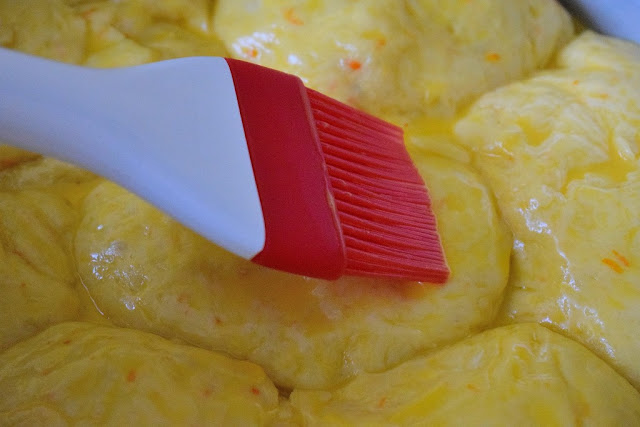
Usually I prepare the yeast dough in the evening and let it rise over night completely, then I take the dough the next morning, shape it, leave it to rise a bit more, cover with egg yolk and bake it. It’s easier this way and works perfectly well! 

Sometimes I varied the amount of butter and the flavours. The one in the photo is richer in butter and has an orange flavour (I added the zest of an orange to the dough and I used 150g of butter). A real treat, we feasted. 

Now it’s up to you to add your touch to this recipe - by adding dried fruits, various nuts, crystallised fruit, spices (vanilla, cinnamon, ginger, etc.) - however respect the steps of the recipe. 

I have written the method and observations so you can succeed easily. This brioche recipe is great to make at the weekend. Perfect for any brunch, picnic or tea time.

Orange Brioche
Orange Brioche
Orange Brioche
Orange Brioche
Orange Brioche
Ingredients:
300g plain flour, plus extra for dusting
2 eggs
70g sugar 
140g butter, at room temperature (plus extra for greasing)
100 ml lukewarm full-fat milk
10g organic baker’s yeast
1/2 tsp salt
*Icing sugar (optional)

For the egg wash:
1 egg yolk
2 tablespoons milk

Preparation:
1. Mix the yeast in the lukewarm milk.

2. In a bowl, make a well with the flour, sugar and salt. Add the yeast milk and the beaten eggs. Mix well. Knead with a spatula or with the dough hooks of an electric mixer, until a soft and smooth dough is obtained 

3. Then, add the butter in pieces and knead again until dough becomes elastic
(until the dough comes away from the container).

4. Then, cover the dough and let it rise to double its volume (for 4 hours) at room temperature. 

5. When the time is up, remove the dough and place it on a well-floured surface.

6. Knead again and then, divide the dough into 7 portions.

7. Roll the dough into a ball.

8. Arrange the dough on a well buttered cake mould and cover. Let it sit for another 2 hours or until it is puffed up.

9. When dough has doubled in size, and before putting the mould in the oven, brush the buns with egg wash (mix the egg yolk and the milk).

10. Bake in a preheated oven at 180ºC for about 20-30 minutes until golden brown.

11. Remove, unmould, and leave to cool on a wire rack.

Observations:
The amount of butter: the more the dough is rich in butter, the better the brioche. By contrast, the dough will be much harder to shape because it is very soft. As a rule, the weight of the butter is at least 50% of the weight of the flour.

Avoid over-kneading once you incorporate the butter - diced and at room temperature - stop as soon as the dough is smooth. If the dough is kneaded too long, there is a risk of having a rubbery crumb.

Monday, 16 July 2018

Banana Muffins

Do you have very ripe bananas, so ripe that the skin has begun to blacken and nobody wants to eat them? Do not throw them away because I have a recipe to die for. It is the easiest, quickest and best banana muffin recipe I have ever tasted! Even if you think you can’t cook, let me tell you that you just can’t go wrong with this recipe! Very yummy muffins!! They were a hit!

Ingredients for 10 muffins:
250g very ripe bananas
150g flour
175g brown sugar
2 large eggs
125ml milk
40g melted butter
1 teaspoon baking soda
1 teaspoon baking powder
Pinch of cinnamon
Paper liners for muffins

Preparation:
1. In a blender, place the eggs, bananas, sugar, melted butter and milk. Beat all until the banana is mashed. It takes about 1 minute to obtain a creamy texture.

2. In a bowl, mix the flour and a pinch of cinnamon with the baking soda and baking powder. Gradually add the banana mixture, stirring well between each addition.

3. Line muffin moulds with paper liners. Fill muffin liners three-quarters full. 

4. Bake in preheated oven at 170°C for about 25 minutes.

5. After the muffins are baked and golden, remove from the oven and allow to cool. Once cool, they are ready to serve.

On another occasion I made these. In case you love crunchy and spicy cakes, just add these ground spices to your batter: 1/2 teaspoons of nutmeg, clove, ginger and cinnamon. Fold 50g of chopped walnuts into the batter at the end with a rubber spatula.


Thursday, 5 July 2018

My favourite cake - Italian Ricotta Apple Torte


This is a lovely cake as the ricotta keeps the cake nice and moist and it has just enough lemon flavour and apples to keep it special.
It is quick and easy to whip up! If you’re a huge fan of the ever famous Italian Ricotta Torte, then this cake version is right up your alley!

Actually, I had posted this recipe a few months ago, because this simple cake has never let me down. It’s become the cake I bake (frequently) without needing a special reason. It is delicious on its own and is equally good with vanilla ice cream or whipped cream.

This torte is best served warm or at room temperature rather than chilled from the fridge. It can also be a wonderful dessert for a picnic.

Italian Ricotta Apple Torte

Ingredients
140g butter
200g brown sugar
3 large eggs
160g flour
A pinch of salt
1 grated zest of lemon
250g ricotta
1/2 tablespoon baking powder
200g grated Golden Delicious apples
Icing sugar (for dusting)

Preparation 
1) Heat oven to 175ºC.

2) Cream the butter and sugar together until light and fluffy.

3) Whisk eggs lightly and gradually add to the butter/sugar mixing on a light speed. Do this gradually so you don’t curdle the mix.

4) Add the grated lemon zest, grated apples, ricotta and baking powder, mix together with a hand blender, followed by the sifted flour: don’t over beat.

5) Pour into prepared mould, smooth the top and bake for about 45 mins on the third level of the oven until golden.

6) Leave to cool in tin for 30 minutes, turn out onto wire rack to continue cooling. Once cold, dust with icing sugar and serve with a dollop of whipped cream or vanilla ice cream. 

Notes: This cake needs slow cooking in a medium oven to ensure it cooks evenly as the batter is a little bit moist. Do not open oven door prior to 45 minutes otherwise the cake will sink!

Thursday, 12 April 2018

Strawberry and Madeleine Delights


Hello everyone!! Today, I thought of sharing this recipe for those who want an attractive and tasty dessert without spending hours in the kitchen. It is a spring recipe made with delicious and fragrant strawberries. This quick, fresh and delicious dessert is sure to make everyone happy!


Ingredients for 4 persons
250g mascarpone 
350g strawberries
50g icing sugar (about 3 tbsps) 
1 teaspoon lemon juice
1 tbsp sugar 
4 madeleines (35g per madeleine)
Dark chocolate grated, to taste (I used Crémant 50% cacao)

Just crumble the madeleines (you can buy them at the bakery or supermarket) in the bottom of the glasses, cover with whipped cream (whisk the mascarpone with the icing sugar and a teaspoon of lemon juice) and add the strawberries on top (having previously mixed them with the sugar to make syrup). Finally, sprinkle the glasses with grated dark chocolate.

If you prepare the dessert in advance the madeleines will become more moist.

Happy Spring!


Monday, 12 March 2018

Matcha Green Tea Cupcakes with Matcha Cream Cheese Frosting

At the end of year, I followed a Matcha green tea cure – it consisted of drinking three cups of this tea, known for its amazing health virtues, each day. After only a couple weeks I felt that I had more energy and I noticed that my digestion had improved considerably (I lost weight without dieting).

Matcha tea is a powdered Japanese tea - the tea plants are grown predominantly in Japan - it is becoming increasingly popular in Europe because of its benefits and exquisitely unique flavour and aroma. Having said that, this little miracle tea costs a fortune. I paid CHF 22.00 for 50 grams of this organic high-grade quality tea.

You can find high quality Matcha green tea at Betjeman and Barton on Rue Saint-Joseph 35, Carouge.

Here are a few of the many benefits this tea has to offer
*Boosts metabolism and helps weight loss
*Prevents cancers and slows ageing
*Good source of fibre and energy
*Improves your physical endurance

Matcha green tea can also be used in cake recipes, I used the basic recipe for all cupcakes and added Matcha green tea powder and made pretty, colourful and yummy cupcakes.

Here is the recipe to make 12 regular sized cupcakes.
Ingredients
115g superfine sugar
115g butter, room temperature
2 eggs
2 tbsp milk
115g self-raising flour
10g Matcha green tea

Preparation
1. Preheat oven to 180ºC. Line a 12 hole muffin tin with paper muffin cases.

2. In a bowl, beat the butter and sugar until a light and whitish batter is obtained. You can use an electric whisk. Add the eggs, one at a time. Sift the flour and fold it into the batter. Add the Matcha green tea powder and the milk and beat to a creamy, thick  and smooth mixture.

3. Put a big spoonful of the mixture into each of the cases. Bake in the preheated oven for about 17 minutes until golden brown.

4. Remove the cupcakes from the oven and set aside to cool for 10 minutes before turning out onto a wire rack to cool completely.

5. When the cupcakes are cold, pipe the Matcha cream cheese frosting on top.

Matcha Cream Cheese Frosting
115g icing sugar
40g unsalted butter, room temperature
1 1/2 tsp Matcha powder
125g cream cheese, cold

Preparation
1. Beat the icing sugar and butter with a handheld electric whisk on medium-slow speed until the mixture comes together and is well mixed.

2. Add the Matcha powder, then the cream cheese in one go and beat until it is completely incorporated. Turn the mixer up to medium-high speed. Beat until the frosting is light and fluffy, at least 5 mins. Do not over-beat, as it can quickly become runny.

3. Decorate the top of each cupcake with the frosting.

Monday, 12 February 2018

Raspberry Cupcakes with Cream Cheese Frosting


I love making cupcakes and I also love eating them. Raspberry cupcakes with cream cheese frosting are one of Sweetheart’s favourites, so I thought I would share this recipe that I made at the end of November. This raspberry filled cupcakes topped with pretty white frosting and fresh raspberries would be a perfect dessert for Valentine’s Day…

I made a basic cupcake recipe and I added 2 raspberries to each cupcake to give that raspberry twist!!

Here is the recipe to make 12 regular sized cupcakes.

Ingredients
115g superfine sugar
115g butter, room temperature
2 eggs
2 tbsp milk
115g self-rising flour
150g fresh raspberries

Preparation
1. Preheat oven to 180ºC. Line a 12 hole muffin tin with paper muffin cases.

2. In a bowl, beat the butter and sugar until a light and whitish batter is obtained. You can use an electric whisk. Add the eggs, one at a time. Sift the flour and fold it into the batter. Add the milk and beat to a creamy, thick smooth mixture.

3. Put a big spoonful of the mixture into the cases, followed with 2-3 raspberries. Bake in the preheated oven for about 17 minutes until golden brown.

4. Remove the cupcakes from the oven and set aside to cool for 10 minutes before turning out onto a wire rack to cool completely.

Cream Cheese Frosting
115g icing sugar
40g unsalted butter, room temperature
125g cream cheese, cold

Preparation
1. Beat the icing sugar and butter with a handheld electric whisk on medium-slow speed until the mixture comes together and is well mixed.

2. Add the cream cheese in one go and beat until it is completely incorporated. Turn the mixer up to medium-high speed. Beat until the frosting is light and fluffy, at least 5 mins. Do not over-beat, as it can quickly become runny.

3. Decorate the cupcakes with the icing and top each cupcake with 4-5 raspberries.


Wednesday, 24 January 2018

Chocolate Mousse

Hello ladies and gents!

Did you know that the most popular dessert in restaurants is chocolate mousse? That inspired me to suggest this recipe (my mum’s recipe) to you. I hope you enjoy this pure delight - it’s rich and yet not too sweet. I made these ones on the last weekend in May (I know, I am always late posting…) for a family dinner at home.


Ingredients
200g excellent dark chocolate (at least 70% cocoa, I used Nestlé) 
100g sugar 
6 egg yolks
6 egg whites 
50g butter
Cherries to decorate

Preparation:
1. Break the chocolate into bits, place chocolate, butter and sugar in a heatproof bowl. Melt over a pan of simmering water (bain-marie). Mix everything with a spatula.

2. When the chocolate has melted, remove the bowl from the heat. Add one egg yolk at a time to the warm chocolate. Whisk quickly and vigorously, until thick and well combined.

3. In a clean bowl, whisk the egg whites until they form firm peaks.

4. Fold the egg whites into the chocolate mixture, using a spatula, until all of the egg white has been completely incorporated into the chocolate. Don't overmix.

5. Spoon the mousse mixture into ramequin glasses or martini glasses. Chill in the fridge for 3-4 hours, or until set.

6. Decorate with cherries before serving.

Serves 7-8

Friday, 29 December 2017

Norbert Tarayre’s Chocolate Fondant

And here we are... for the last post of 2017. I would like to share with you an easy, quick and scandalously yummy recipe from Norbert Tarayre. Norbert is a young and renowned French chef who presents a weekly TV cooking show that we love, called “Norbert, commis d’office”.

For 2018, I wish you a Happy Hygge Year because happiness lies in the simple things that life offers us every day. Take care of yourself and never forget to spread kindness and solidarity around you.

Now, prepare the chocolate fondant, put a bottle of bubbles in the fridge and light the candles because the countdown to the New Year has started...tick, tock, tick, tock.....

Lots of love

Ingredients
200g 70 % cocoa dark chocolate
200g sugar
200g butter, room temperature
30g flour
5 eggs
Icing sugar for decoration

Preparation
Preheat the oven to 190ºC.

Melt the chocolate and butter in a bain-marie.

Whisk eggs and sugar to a frothy mixture. Add the flour while mixing.

Add the melted butter-chocolate mixture while stirring.

Butter and flour a mould.

Pour the mixture into the mould. Bake for 22 minutes at 190ºC.

Remove the fondant from the oven and leave to cool slightly in the mould before turning out onto a wire rack to cool completely. Sprinkle the fondant with icing sugar.

Tip: can be made one day advance - it is even better.